
How to use Google Ads Enhanced Conversions
Enabling enhanced conversions for leads in Google Ads
Enhanced conversions for leads let Google Ads match the offline conversions Heeet sends — qualified leads, sales-accepted opportunities, closed-won deals from your CRM — back to the ad click that generated them, using hashed first-party data (email, phone) instead of relying on the click ID alone. The result is more durable attribution and better Smart Bidding signal.
This guide walks through enabling it in your Google Ads account so that the conversions Heeet uploads are accepted and attributed.
Before you begin
You'll need:
- Conversion tracking already active in the Google Ads account.
- Admin access to the account — accepting the Customer Data Terms requires it, and it can't be done through the API.
- At least one offline conversion action for leads (an "Import" conversion action, type
UPLOAD_CLICKS). This is the action Heeet uploads against. - Auto-tagging enabled, so click IDs (GCLID) are captured alongside the user-provided data.
Two prerequisites have to be true before any upload with hashed identifiers will be accepted: the Customer Data Terms must be accepted, and enhanced conversions for leads must be turned on. They're separate settings and produce separate errors, so complete both.
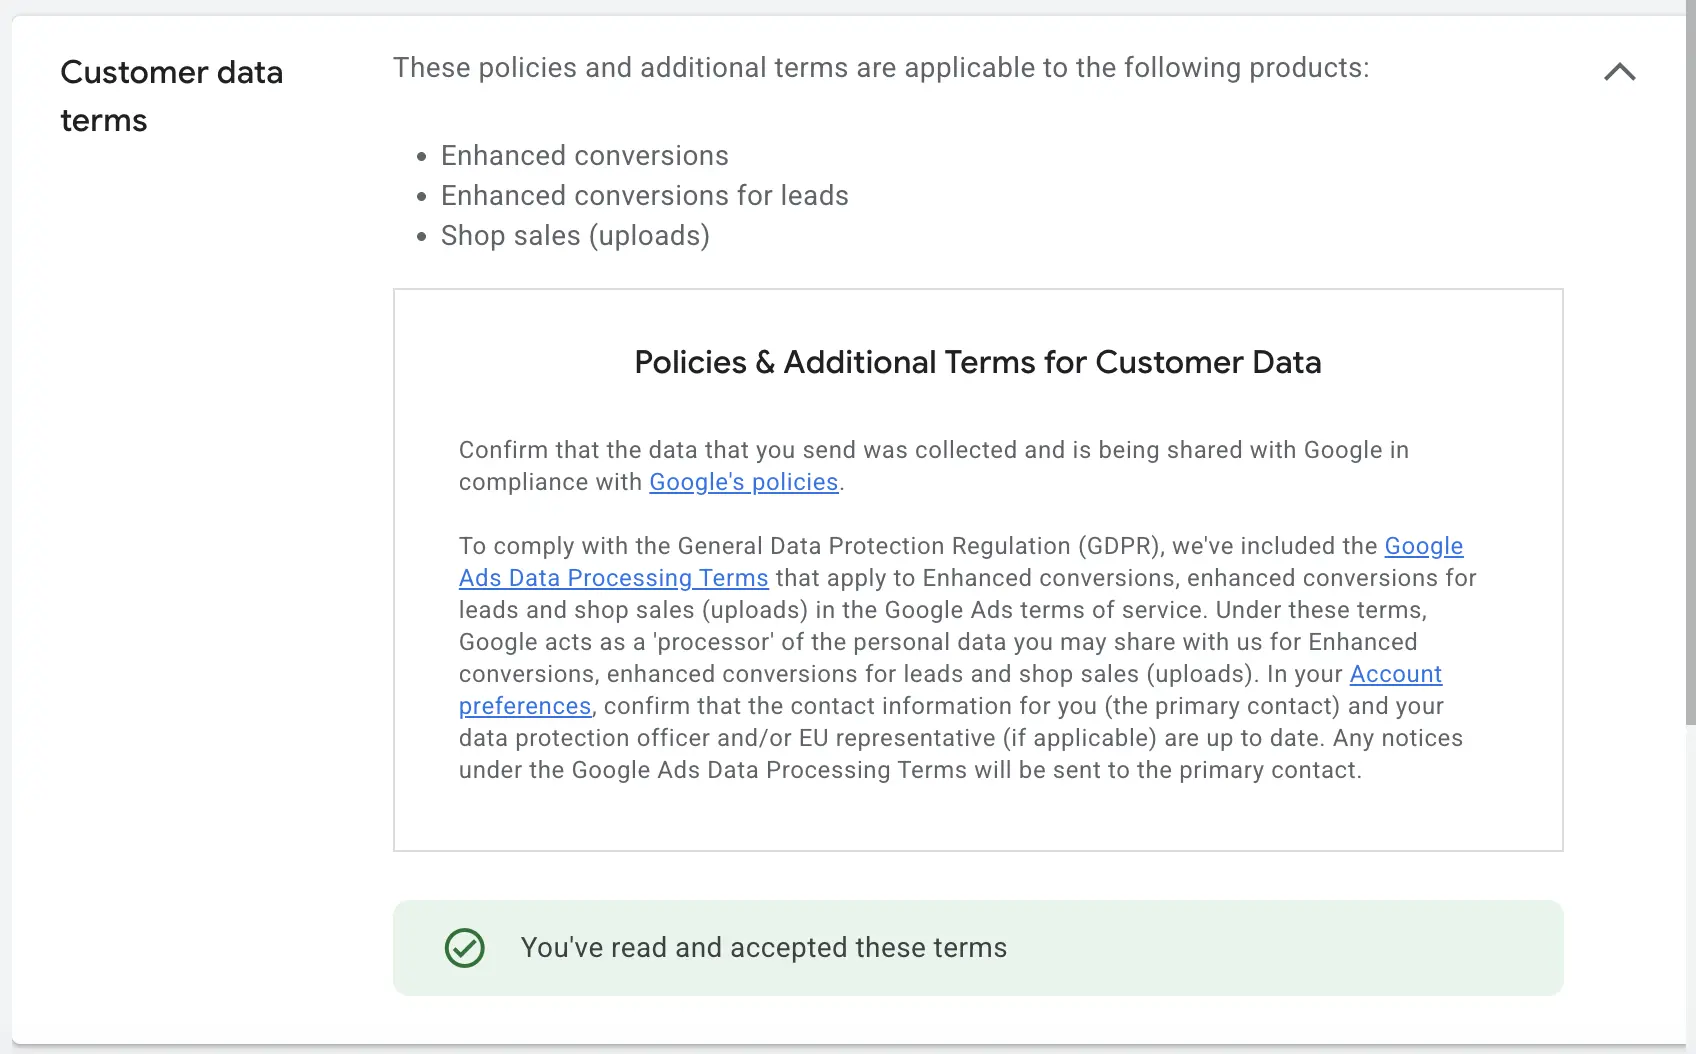
Step 1 — Accept the Customer Data Terms
- In Google Ads, click the Goals icon.
- Open the Conversions dropdown in the section menu, then click Settings.
- Next to Customer data terms, click View Terms.
- Review the "Policies and Additional Terms for Customer Data," check I have read and accept the terms on behalf of my company, and click Agree.
The status updates to Accepted. These terms apply to the entire account (or manager account) — you accept them once, not per conversion action.
If you don't see the Customer data terms option, your conversions are being tracked by a manager (MCC) account. The terms must be accepted from that manager account instead. See Working with a manager account below.
Step 2 — Turn on enhanced conversions
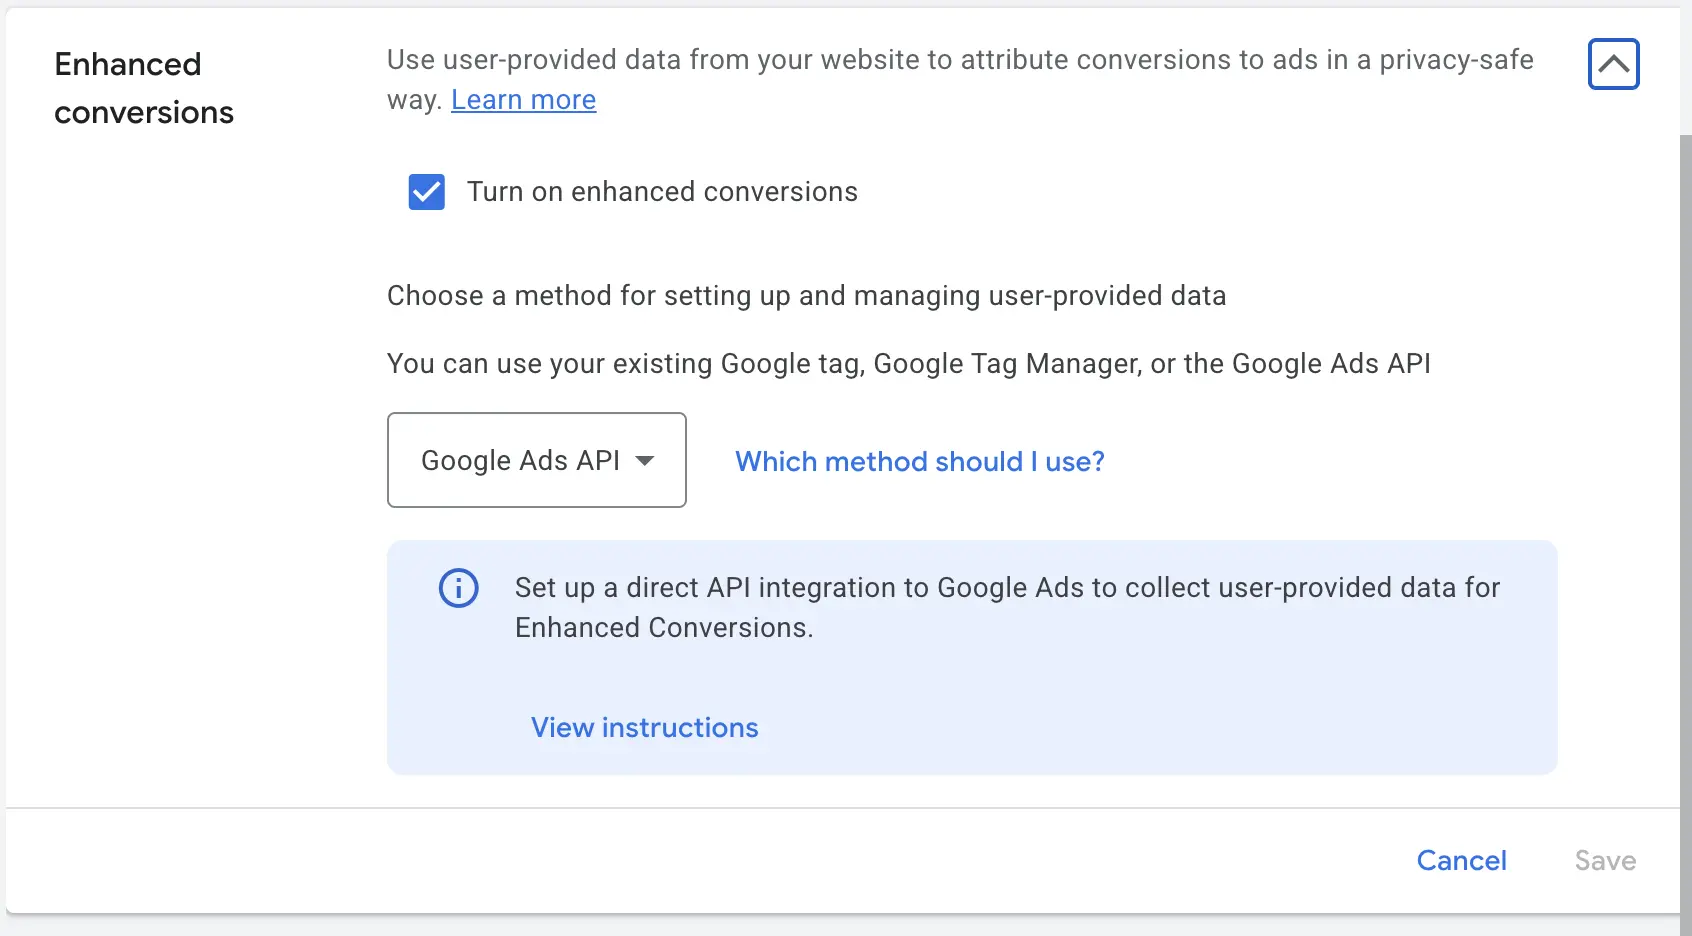
- Still under Goals → Conversions → Settings (or from the specific leads conversion action's Summary), open the Enhanced conversions section.
- Check Turn on enhanced conversions.
- When prompted to choose how data is collected, select the method that matches your setup. Because Heeet uploads conversions through the API, that path carries the hashed email and phone with each conversion.
Note (2026 change): Google is combining enhanced conversions for web and leads into a single on/off setting. Google Ads now accepts user-provided data from website tags, Data Manager, and API connections at the same time, so you no longer need to pick a single implementation method. Existing users are migrated automatically. If your account already shows the unified setting, just make sure enhanced conversions is turned on.
Step 3 — Working with a manager account (MCC)
This is the single most common reason enhanced conversions appear "enabled" but uploads still fail.
Google checks these settings against the effective conversion account — the account that actually owns and manages conversion tracking — which is not always the account you're looking at. If your conversions are tracked cross-account by a manager, the effective conversion account is the manager account.
What this means in practice:
- Accept the Customer Data Terms on the manager account, not the sub-account, when cross-account conversion tracking is in use.
- Any manager account that uploads on behalf of another account must also have accepted the terms.
- Heeet must upload using the effective conversion account's ID, not the sub-account's.
To find the effective conversion account, run this query (Google Ads Query Language) against the account:
SELECT
  customer.conversion_tracking_setting.google_ads_conversion_customer,
  customer.conversion_tracking_setting.conversion_tracking_id,
  customer.conversion_tracking_setting.cross_account_conversion_tracking_id,
  customer.conversion_tracking_setting.conversion_tracking_status
FROM customer
The value of google_ads_conversion_customer is the effective conversion account. If it points to a different account than the one you're managing, that's where the terms and the enhanced-conversions setting must be enabled — and that's the account Heeet's uploads should target.
Step 4 — Verify it's enabled
In the interface: the Customer Data Terms status shows Accepted, and the enhanced conversions for leads toggle is on.
Programmatically, confirm both flags on the effective conversion account:
SELECT
  customer.id,
  customer.conversion_tracking_setting.accepted_customer_data_terms,
  customer.conversion_tracking_setting.enhanced_conversions_for_leads_enabled
FROM customer
Both accepted_customer_data_terms and enhanced_conversions_for_leads_enabled should return true. Run this against the effective conversion account identified in Step 3, not just the sub-account.
After enabling, allow time to propagate. Diagnostics and matched-conversion data can take up to 48 hours to appear, and a successful upload response does not by itself mean a conversion was matched.
Sending conversions automatically from Salesforce with Heeet
Everything above prepares the Google Ads side. It doesn't, on its own, send any conversions — it tells Google Ads to accept and match them once they arrive. With Heeet, you don't upload conversions manually or maintain CSV exports: because Heeet runs natively inside Salesforce, conversions are sent to Google Ads automatically the moment your CRM conditions are met.
You configure this in Heeet with a Conversion Trigger:
- Create the trigger — pick the connected Google Ads account and customer ID, the existing Google Ads conversion action, and the Salesforce object that drives the conversion (Lead, Contact, or Opportunity).
- Define the condition — the CRM event that fires the conversion, using the field's API name (for example, Lead status = Qualified, or Opportunity stage = Closed Won).
- Map value and identifier — the Salesforce amount field to send as conversion value, and the GCLID field that ties the conversion back to the original ad click.
- Save and activate. From then on, matching conversions flow from Salesforce to Google Ads automatically, and Google attributes them to the right campaigns, ad groups, and keywords — no manual uploads.
For the full step-by-step, see Send offline conversions to Google Ads.
Tip: Enhanced conversions strengthen matching by adding hashed first-party data (email, phone) on top of the GCLID. Make sure the GCLID is captured and stored on the Salesforce record — if last-click GCLID can be missing, a Salesforce admin can add a formula field that falls back to the first-click GCLID so the trigger always has an identifier to send.
Troubleshooting
CUSTOMER_NOT_ACCEPTED_CUSTOMER_DATA_TERMSThe Customer Data Terms haven't been accepted on the account being checked. If you've already accepted them on one account and still see this, you're almost certainly uploading against a different account than the one where you accepted — verify the effective conversion account (Step 3) and confirm the upload's account ID matches it.
CUSTOMER_NOT_ENABLED_ENHANCED_CONVERSIONS_FOR_LEADSThe terms are accepted but the enhanced conversions for leads toggle is off. Complete Step 2 on the effective conversion account.
Uploads succeed but conversions aren't matchedConfirm that each conversion carries normalized, SHA-256–hashed user-provided data (email and/or phone), that the GCLID is included when available, and that the conversion action referenced is the correct UPLOAD_CLICKS action owned by the effective conversion account. Normalization matters: trim whitespace, lowercase, format phone numbers to E.164, and apply the Gmail/Googlemail local-part rules before hashing — a malformed hash fails silently.
The terms option isn't visible at allConversions are tracked by a manager account. Accept the terms from that manager account (Step 3).
Related
- Enhanced conversions for leads is an upgraded offline conversion import — the two share the same upload flow, with enhanced conversions adding the hashed first-party match keys.
- If you manage several client accounts, remember that these settings live on the effective conversion account. Enabling them on the wrong account is the most frequent cause of rejected uploads.